Documentation
User Guide
Last updated: July 25, 2026
This guide explains how to use LinkInBioPremium to publish your bio link, add Shoppable Action Videos, sell digital products, add an easy donation button, accept appointment bookings, create short links, highlight a primary CTA, capture leads, sync them to your CRM, and preserve campaign attribution. Available on web, iOS, and Android with the same core workflow.
1. Getting started
- 1.Create an account on the homepage (or sign in if you already have access).
- 2.Complete your account profile: name, organization, and timezone.
- 3.Create your first bio page from the dashboard (Link Builder).
- 4.Optionally connect a CRM integration before sharing your public link.
2. Visual walkthrough
Follow the screenshots below in order (1 at the top through 9 at the bottom). They show the Creator Portal Link Builder and Selling flows: lead capture, page copy, analytics and social icons, embeds and the Universal Action Button, form fields, footer links, payouts, catalog blocks, and digital product delivery.
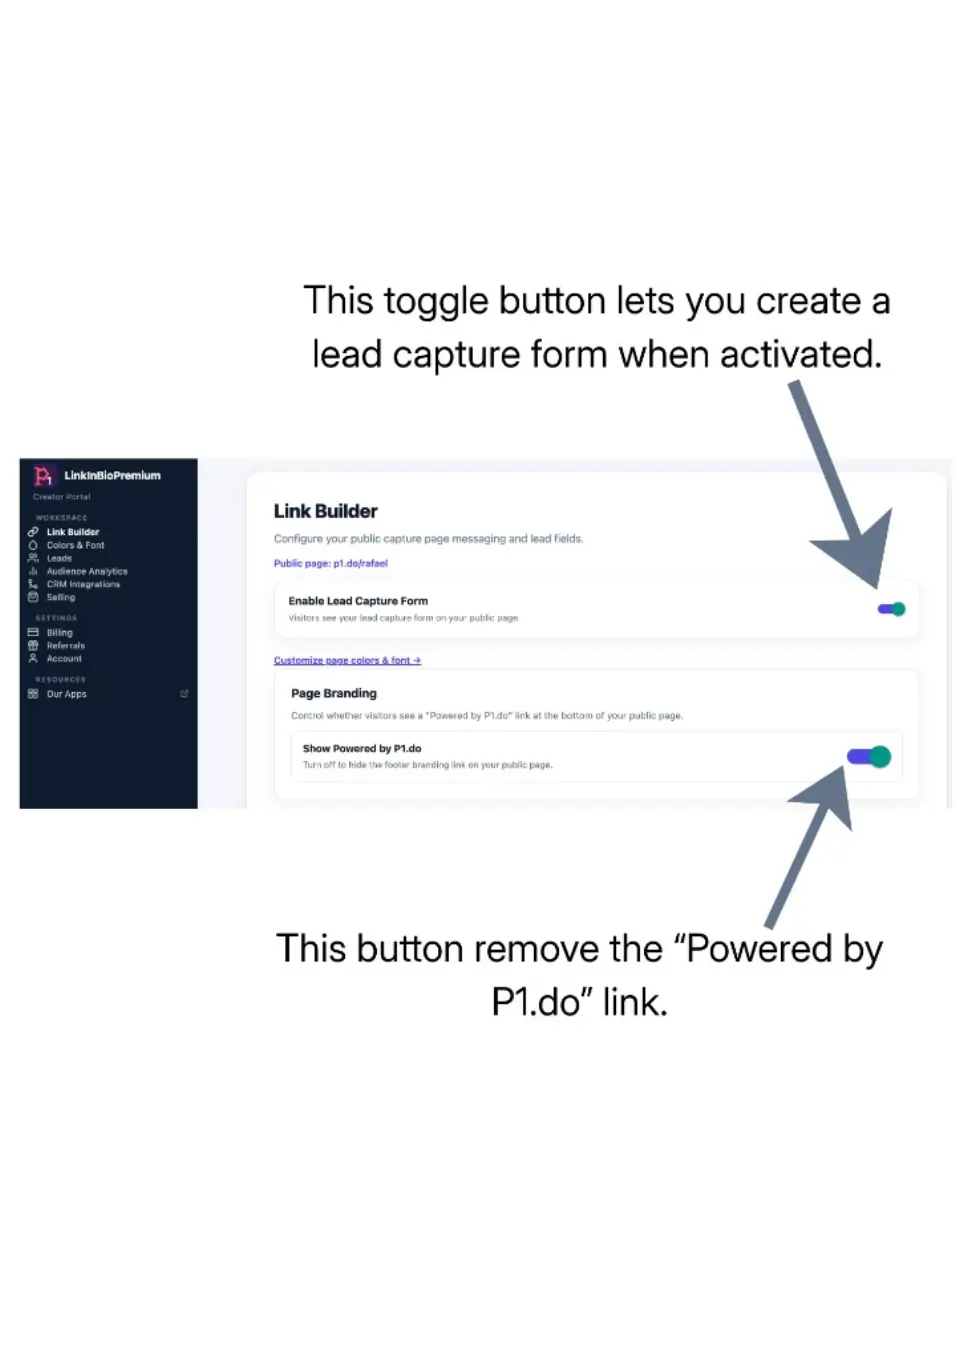
1. Turn on Custom lead capture and/or Contact form to collect emails. You can still show standard links, selling, and media on the same page—reorder them under Page layout. Free: up to 5 pages. Premium: unlimited pages; toggle Show Powered by P1.do off to hide footer branding.
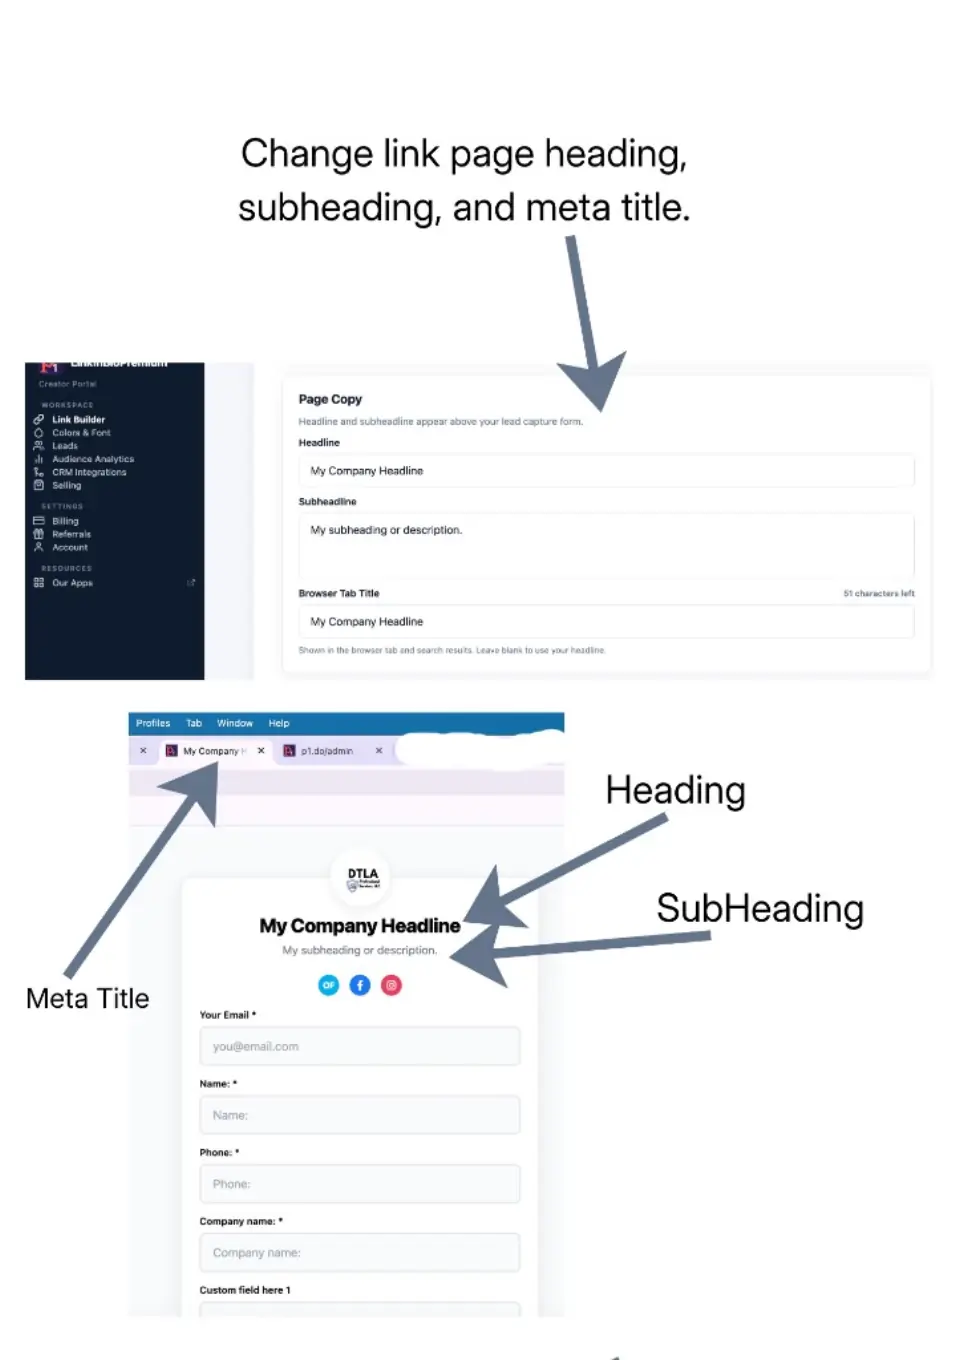
2. Set headline, subheadline, and browser tab (meta) title under Page Copy—these appear at the top of your public page.
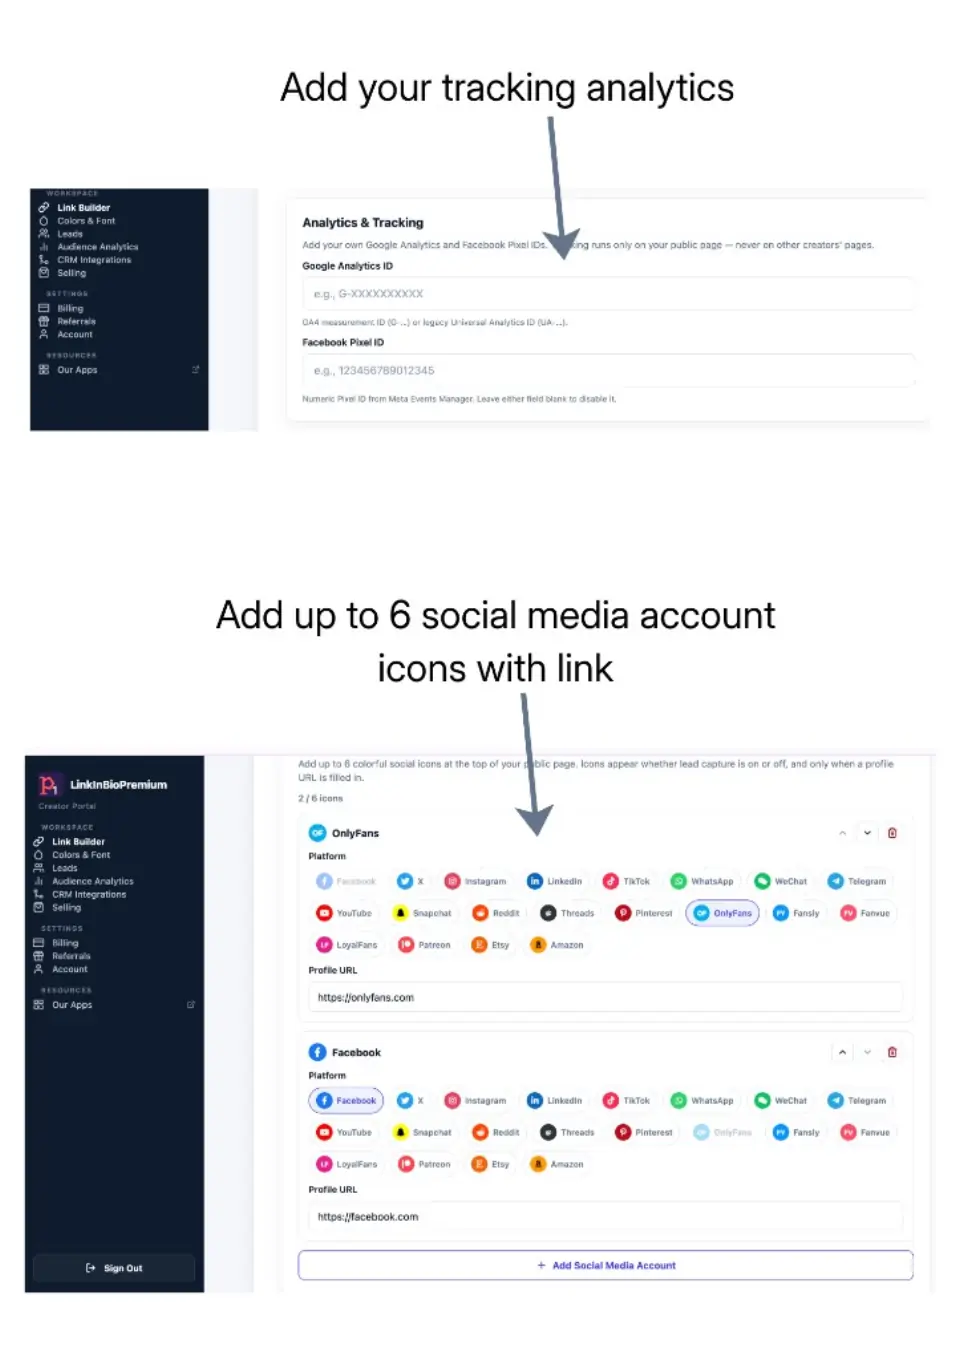
3. Add Google Analytics / Facebook Pixel IDs, then up to six social icons with profile URLs for the top of your page.
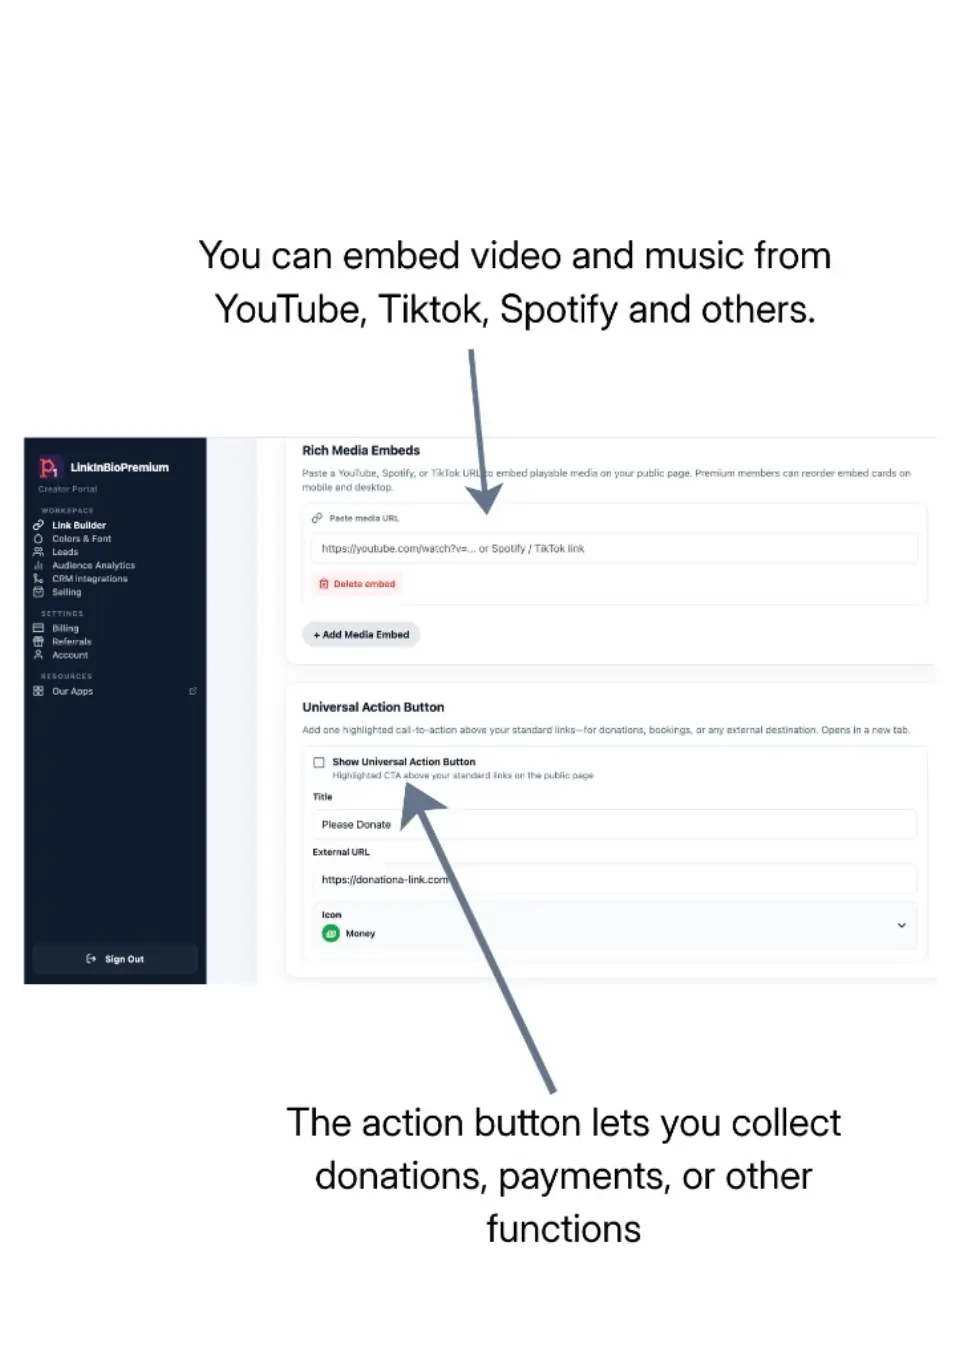
4. Paste YouTube, Spotify, or TikTok URLs for embeds. Enable the Universal Action Button for one primary CTA (donate, book, or buy).
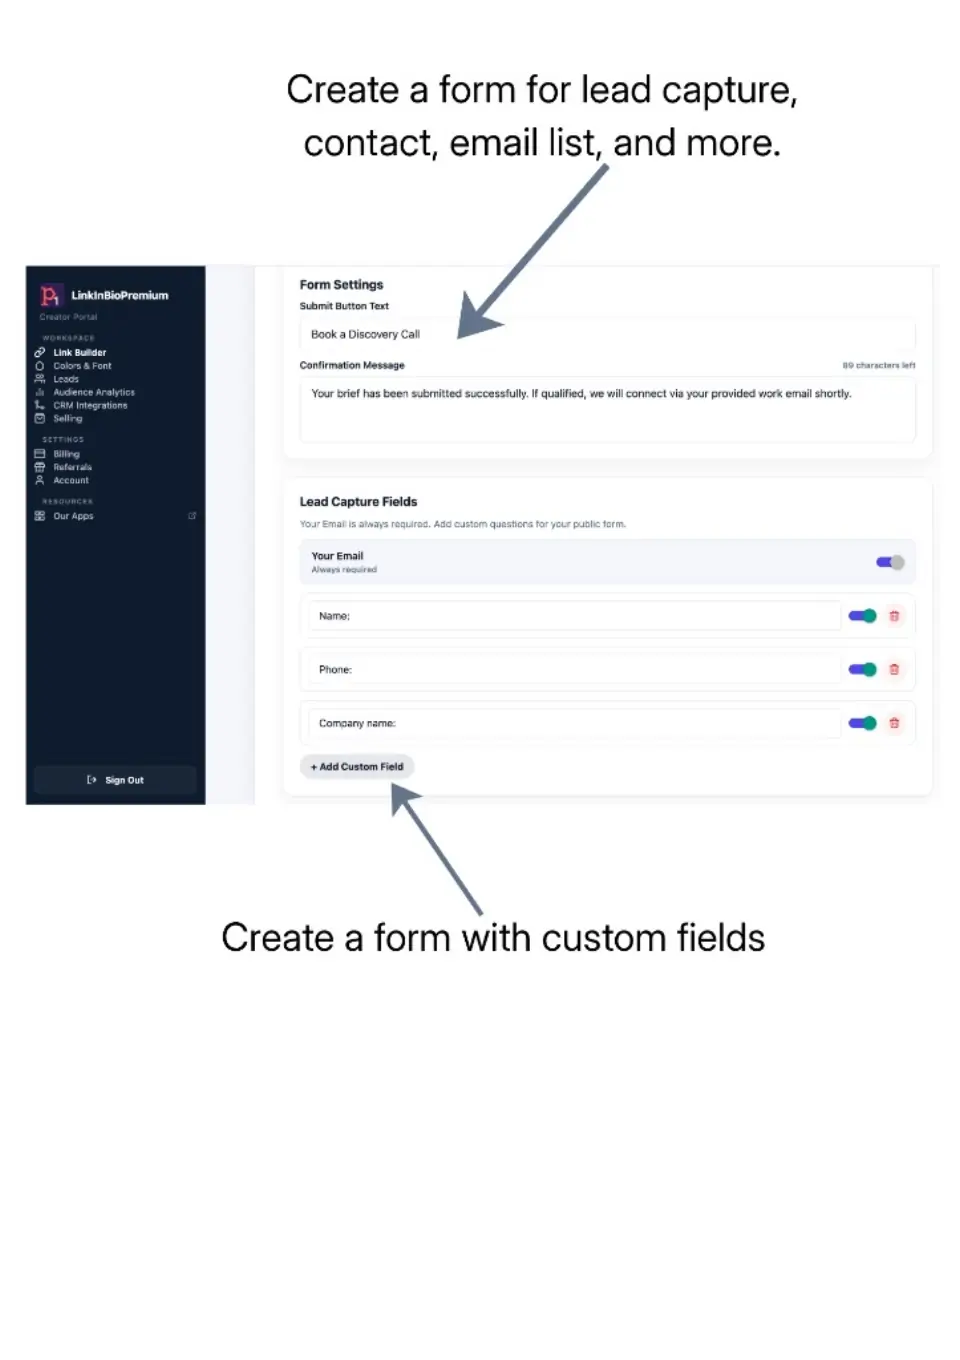
5. Customize submit button text, confirmation message, and custom fields (Name, Phone, Company, and more). Your Email stays required.
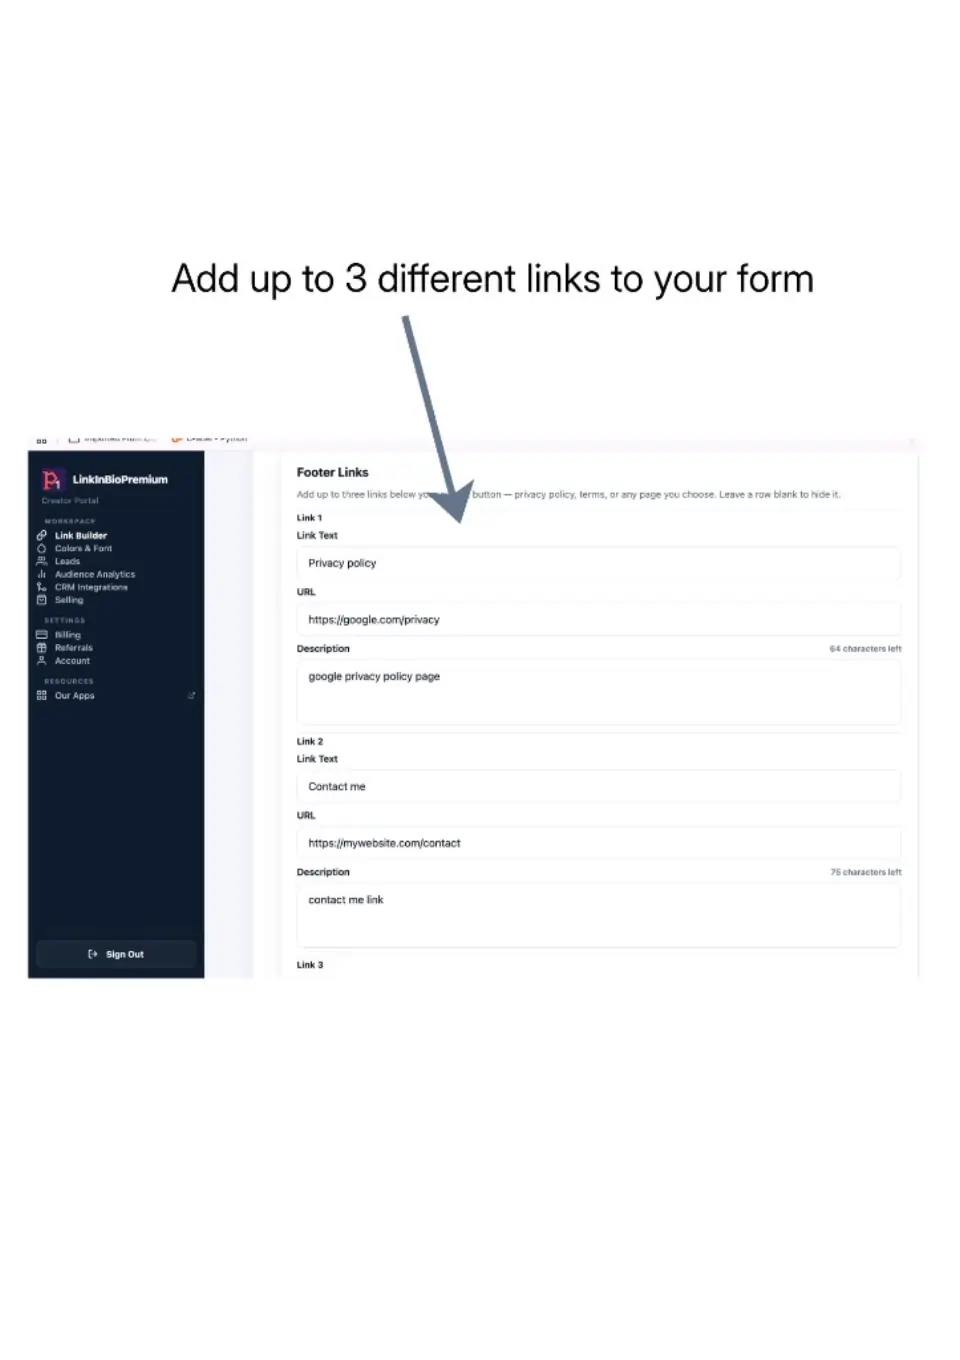
6. Every public page shows a small legal footer with Privacy Policy, Terms of Service, and Disclaimer (https://p1.do/…). Free plans always use those P1.do links. Premium: edit copyright text and replace the three links under Link Builder → Page footer (no Contact Us link in the default footer).
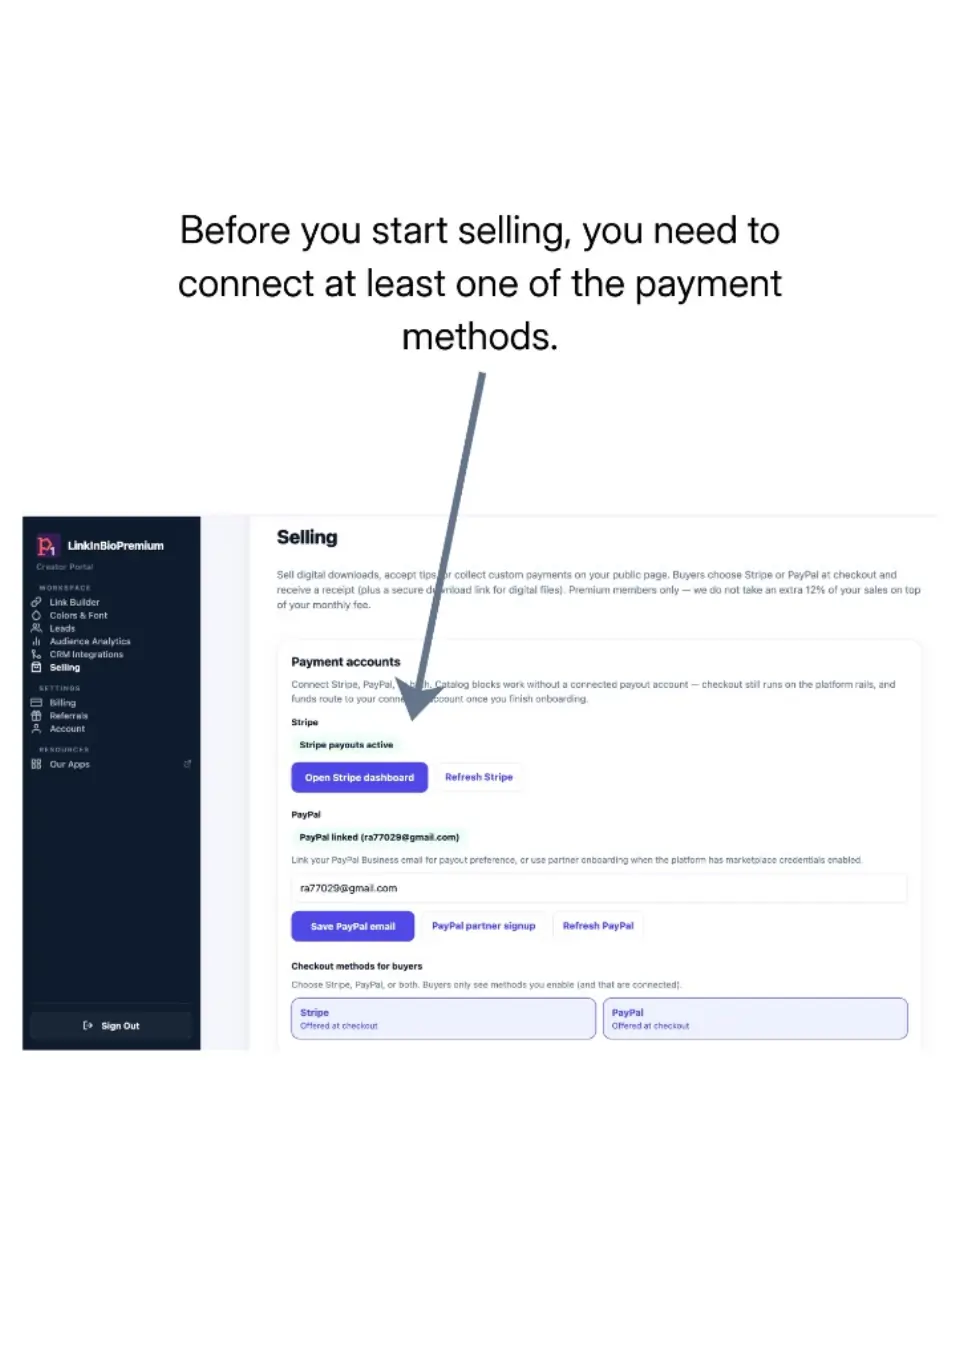
7. Before Selling, enable at least one checkout rail: Stripe, PayPal, and/or a crypto wallet (ETH/POL) on the Selling screen.
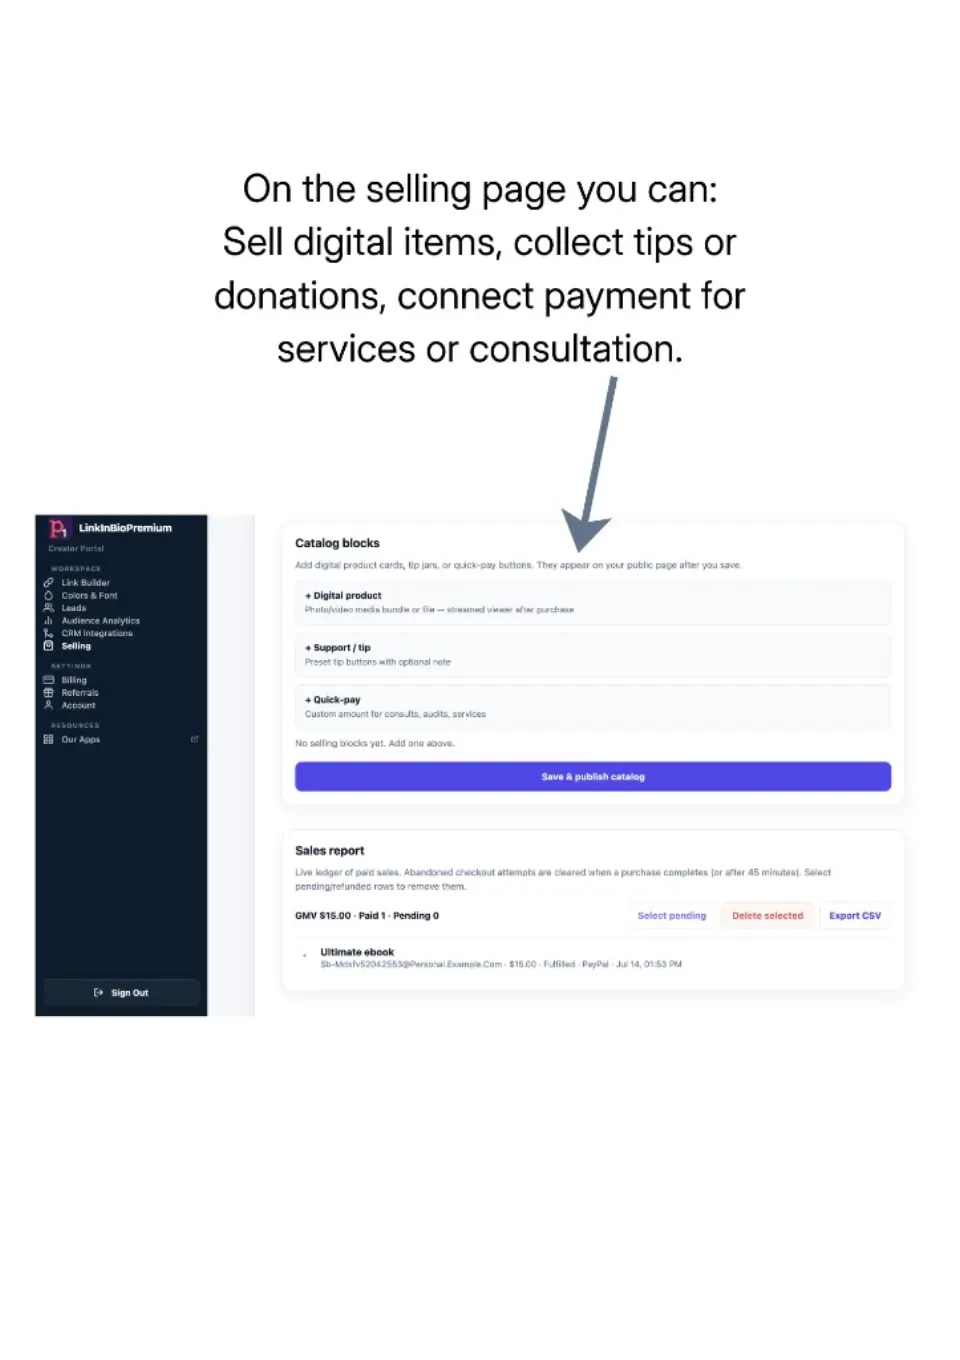
8. On Selling, add Digital product, Support / tip, or Quick-pay blocks, then save & publish. Track paid sales in the sales report.
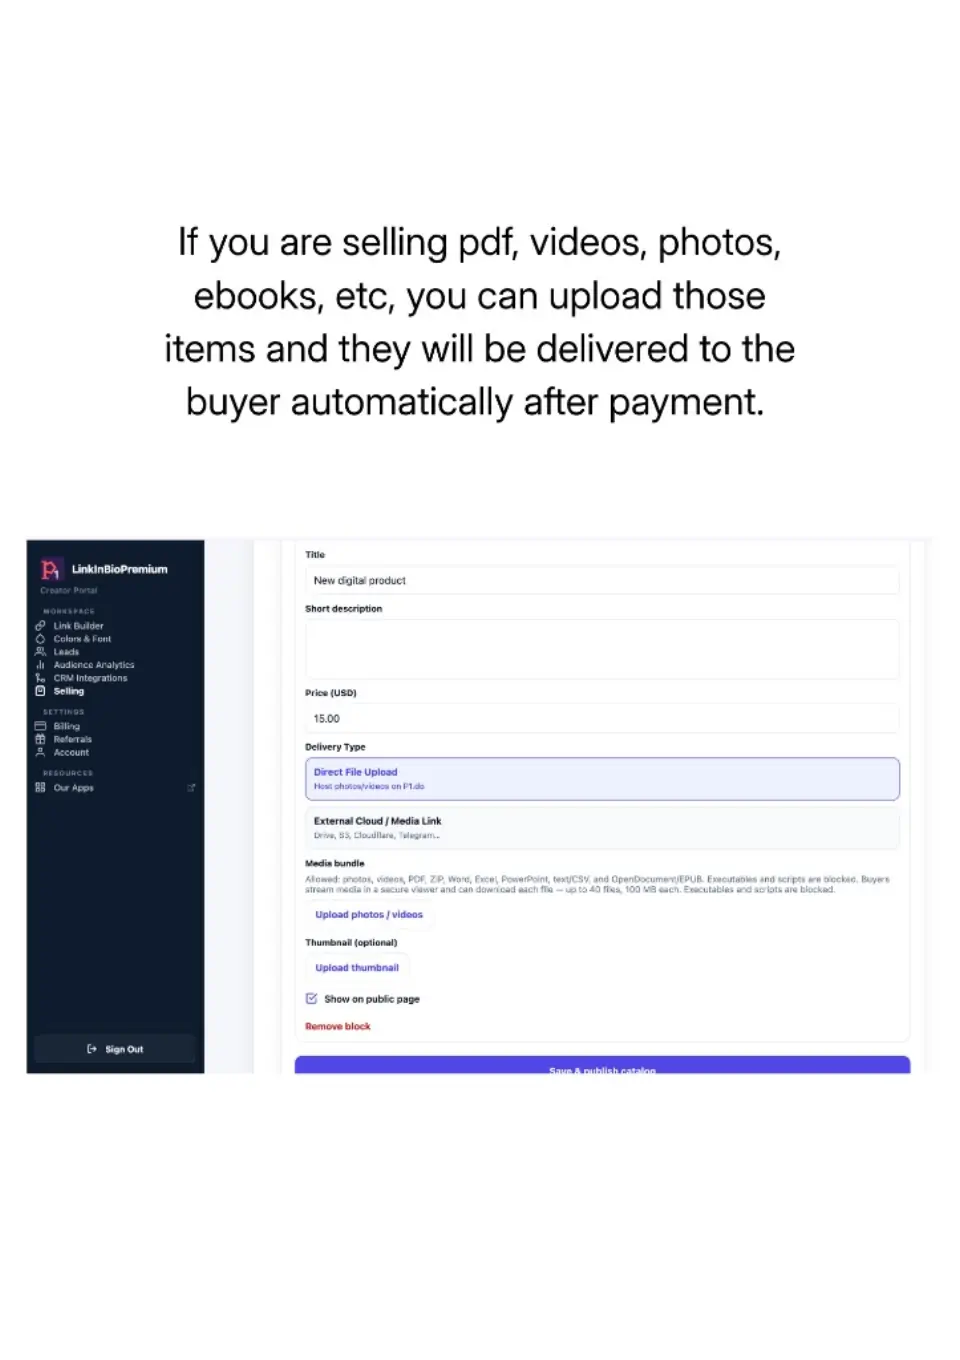
9. For PDFs, videos, photos, or ebooks: set price, upload files (or link external storage), show on the public page, and save—delivery is automatic after payment.
3. Build your bio page
Your bio page is the link you place in social profiles, email signatures, and campaign destinations. Keep each page focused on one primary conversion goal—plus Selling or Booking when those sections are enabled. See screenshots 1–6 above for the Link Builder UI.
- Add a headline and subheadline aligned to your offer (consultation, lead magnet, product, tip jar).
- Use the Universal Action Button for one primary “Buy Now,” “Donate,” “Book,” or offer CTA above your links.
- Add social accounts, standard links, and media embeds as needed.
- Enable Custom lead capture and/or Contact form for inbox-style messages; reorder sections under Page layout.
- Add Shoppable Action Videos for a mobile portrait grid with tap-to-shop CTAs (Free and Premium).
- Premium: add a Booking section so visitors can schedule appointments without leaving your bio.
- Create pages under Dashboard → Pages (Free: up to 5; Premium: unlimited). Child pages can use Page access (entry, password, or paywall).
- Every public page (bio, child pages, booking) shows a legal footer with Privacy Policy, Terms of Service, and Disclaimer.
- Preview on web and mobile before publishing.
Page footer: Free accounts always show the P1.do legal links (Privacy Policy, Terms of Service, and Disclaimer). Premium members can customize the copyright line and those three links under Link Builder → Page footer (for example, point Privacy to your own policy URL). The default footer does not include Contact Us—use the Contact form section or your own link for audience messages. Optionally hide “Powered by P1.do” under Page Branding (Premium).
Feature overviews for visitors and SEO: Shoppable Videos (/shoppable-videos), Selling (/selling), Appointment Booking (/appointment-booking), CRM (/crm), Lead Capture (/lead-capture), Contact Forms (/contact-form), and Multi-Page Bios (/pages).
4. Shoppable Action Videos
Shoppable Action Videos are available on Free and Premium. They add a mobile-first portrait grid to your bio or a child page. Visitors open a photo or short video and tap an HTTPS CTA to leave for your store, affiliate link, or offer page. Marketing overview: /shoppable-videos.
- Unlimited uploads (practical safety cap); videos ≤5 minutes; JPEG/PNG/WebP or MP4/MOV; videos up to 160 MB.
- Public grid shows 15 items at a time with Load more; visitors can sort by Latest (default), Popular, Oldest, or Featured (your pin order).
- Optional CTA label (≤24 characters) and HTTPS URL — omit both to publish media without a shop button.
- Pin up to three clips so they stay first in the grid.
- Optional section heading; reorder the block under Page layout with Selling, Booking, links, and forms.
- CTA click counts and last-click time (America/Los_Angeles) appear under each item in Link Builder when a CTA URL is set.
- Theme packs under Dashboard → Themes → Shoppable videos—replace sample media with your own after applying.
- 1.Optional: open Dashboard → Themes, filter Shoppable videos, apply a template to a page.
- 2.In Link Builder (home or child page), ensure Shoppable Action Videos is visible under Page layout.
- 3.Add media, optionally set CTA label + HTTPS URL, pin hero clips, save, and open your public URL on a phone.
- 4.Optional (child pages only): under Page access, choose Entry, Password, or Paywall to lock the library before it loads.
- 5.After traffic, refresh Link Builder to review CTA click stats.
Child-page access (Link Builder → Page access): Open (default), Entry (acknowledgment screen), Password, or Paywall. Modes are mutually exclusive and never apply to Home. Paywall uses your Selling checkout rails (Stripe / PayPal / crypto); after payment the buyer gets an entry code by email and on the receipt screen—they redeem it on the same child URL. Creators can also mint or revoke codes manually. Free plans include up to 5 pages page so you can publish a gated video library without upgrading.
Shoppable clips send visitors to external HTTPS destinations. For in-bio Stripe, PayPal, or crypto product checkout (separate from a page paywall), enable Premium Selling. Many creators use both on one page.
5. Selling, donations & tips (Premium)
Selling is a Premium feature. Open Dashboard → Selling to add commerce blocks to your public page (screenshots 7–9 above). Donation / tip buttons are designed to be quick: pick Support / tip, set amounts, save, and they appear on your bio. Free plans see an upgrade prompt on this screen; products are not shown on the public page until you are Premium.
- Digital product — paywalled download (PDF, template, audio, etc.).
- Support / tip (donation) — suggested amounts, optional custom amount and note.
- Quick-pay — custom amount for consults, audits, or services.
- Card / PayPal: connect Stripe Connect and/or PayPal so hosted checkout can route funds to you.
- Crypto / e-currency: paste a plain EVM wallet address (Ethereum or Polygon), enable Crypto, and buyers send ETH or POL straight to you from a browser wallet (MetaMask and similar). Non-custodial—no platform wallet and no seller API keys.
- Optional coupons for eligible catalog offers (when enabled in your workspace).
Pricing: LinkInBioPremium uses a monthly Premium subscription. We do not take an extra 12% (or any platform percentage) of your creator profit on top of that monthly fee. Standard payment-processor fees from Stripe or PayPal still apply on those rails; crypto checkouts are wallet-to-wallet (network gas fees only).
- 1.Go to Dashboard → Selling.
- 2.Enable checkout methods: Stripe, PayPal, and/or Crypto (save your wallet address first for crypto).
- 3.Click Add and choose Digital product, Support / tip, or Quick-pay.
- 4.Fill in title, description, price or suggested tip amounts, and upload files if needed.
- 5.Save the catalog, then open your public URL to confirm the block appears.
- 6.Share your bio link—visitors pay with the methods you enabled (hosted Stripe/PayPal or Pay with Crypto).
Customer support contact: under Dashboard → Account → Customer Support Contact, set a support email and optional messaging URL (for example WhatsApp or Instagram DM). These appear on the public checkout popup so buyers can reach you for delivery, access, or refund questions. You are responsible for fulfilling digital goods and handling refunds for your own sales—LinkInBioPremium only refunds platform membership subscriptions (see the Refund Policy). Buyers who need to report a seller can use the Contact page with their Order ID.
6. Appointment booking (Premium)
Booking is a Premium feature under Dashboard → Booking. Clients schedule services on your public page section or at /book/{username} on p1.do. Confirmations, reminders, and self-serve cancel/reschedule (within your cutoff window) are handled automatically.
- Settings — business name, timezone, weekly hours, time format (12h/24h), cancel/reschedule cutoff, payments (on-site, Stripe, deposits, PayPal, crypto), Look Busy, and embed snippet.
- Services — duration, price, location (on-site, phone, Zoom, Google Meet, custom, client address), 1-on-1 or group capacity.
- Staff & blocks — optional team members; block out vacation or busy times (including imported Google busy times).
- Appointments — confirm, complete, no-show, cancel, reschedule, or permanently delete; add manual appointments; paste a Zoom join URL and email it to the client.
- Coupons, waitlist, analytics, and audit — discounts, overflow demand, booking stats, and change history.
- Integrations — optional Google Calendar connect (write bookings + import busy times). Zoom does not require OAuth.
Zoom meetings are manual by design: create the meeting in Zoom yourself, open the appointment, use Meeting link, paste the join URL, then Save & email client. Google Meet can still be created automatically when Google Calendar is connected and the service location is Google Meet.
- 1.Go to Dashboard → Booking and enable booking.
- 2.Set timezone and weekly hours; create at least one active service.
- 3.Optionally add staff, blocks, coupons, and connect Google Calendar.
- 4.Share /book/{username} or enable the Booking section on your bio page.
- 5.When a Zoom booking arrives, create the Zoom meeting, paste the URL on Appointments, and email the client.
- 6.Clients manage cancel/reschedule from their email manage link; they can also add the event to Apple/Google Calendar from that page.
7. Short links
Dashboard → Short Links turns long URLs into short ones at https://p1.do/s/{alias} (aliases are 1–20 alphanumeric characters). Free accounts can keep up to 20 active links; Premium up to 200. Clicks use a 302 temporary redirect by default so you can change the destination later without breaking shared links. Any UTM query parameters on the short URL (for example ?utm_source=ig) are forwarded to the destination.
- Create, edit, enable/disable, tag, and filter links; copy the short URL from the dashboard.
- Bulk CSV import — columns such as destinationUrl, alias, title, tags (up to 200 rows per upload).
- Click analytics — daily volume plus referrer, device/OS, and country/region aggregates.
- Premium tracking pixels — Google Analytics, Meta, TikTok, and X/Twitter. When pixels are set, visitors hit a lightweight interstitial that fires the scripts, then continue to the destination.
- Premium custom domains — brand short links on your own hostname (e.g. link.yourbrand.com).
- Premium developer API — generate hashed API keys and call POST/GET/PUT /api/v1/links plus GET /api/v1/analytics/{alias}.
- Free-tier retention — inactive free short links (no recent login and fewer than 5 clicks in 90 days) get email warnings at about 10 days, 5 days, and 24 hours, then are purged so aliases return to the pool.
Custom domain setup (Premium): add the domain under Short Links → Domains. The app shows the TXT ownership record and Firebase Hosting A record(s) to paste at your registrar (Namecheap, GoDaddy, Cloudflare, and similar). Tap Verify Domain when DNS has propagated — the backend checks A (and TXT) records, then registers the hostname with Firebase Hosting so SSL is provisioned automatically. No Firebase Console step is required.
- 1.Open Dashboard → Short Links and paste a destination URL (optional custom alias and tags).
- 2.Share https://p1.do/s/{alias}, or use your verified custom domain path once status is Active.
- 3.Optional (Premium): add GA / Meta / TikTok / X pixel IDs on the link, or import many rows via CSV.
- 4.Optional (Premium): Domains tab → add hostname → publish TXT + A records → Verify Domain.
- 5.Optional (Premium): API tab → create a key (shown once) for external create/update/analytics calls.
- 6.Filter by tag or open a link’s analytics to review daily click volume.
8. Universal action button
In Link Builder, enable the Universal Action Button to highlight one primary CTA (for example “Buy Now!,” “Donate,” or “Book”) above your standard links. Set a title, optional icon, external URL, and toggle it on. Give it breathing room on the page so it stays distinct from the rest of your link list.
10. Capture leads & contact forms
Forms on LinkInBioPremium write leads to your workspace and, when configured, push directly to your CRM. Use Custom lead capture for campaign-style funnels with custom fields, and Contact form for a simpler email + message inbox. Both can live on the same page and include spam protection (“I’m not a robot”).
- Custom lead capture: “Your Email” is required, plus optional custom questions (progressive profiling).
- Contact form: email + message for general inquiries (separate from p1.do/contact support).
- Optional fields: name, company, role, phone, and other custom questions on lead capture.
- Submissions can sync to HubSpot, ActiveCampaign, Kit, or a custom webhook (Premium CRM integrations).
- Enable consent text where your jurisdiction requires it.
- Test submissions with a personal email before running paid traffic.
11. Connect HubSpot
- 1.Go to Settings → Integrations → HubSpot.
- 2.Click Connect and authorize OAuth access in HubSpot.
- 3.Map form fields to HubSpot contact properties (email, firstname, lastname, company, utm_*).
- 4.Choose a default pipeline or lifecycle stage for new leads.
- 5.Submit a test lead and verify the contact record in HubSpot.
12. Connect ActiveCampaign
- 1.Go to Settings → Integrations → ActiveCampaign.
- 2.Enter your ActiveCampaign API URL and key, or use the guided OAuth flow when available.
- 3.Select the list and tags to apply to new subscribers.
- 4.Map custom fields for UTM and profiling data.
- 5.Run a test submission and confirm the contact in ActiveCampaign.
13. UTM persistence
Append standard UTM parameters to your public bio URL when sharing in campaigns:
- utm_source — platform (linkedin, newsletter, podcast).
- utm_medium — channel type (social, email, paid).
- utm_campaign — initiative name (q3-webinar, coach-launch).
- utm_content — creative or link variant (cta-a, hero-banner).
LinkInBioPremium carries these values through clicks and form submissions so your CRM reports match the campaign that sourced the lead—without manual spreadsheet reconstruction. Short links also forward UTM query params from the short URL to the destination.
14. Progressive profiling
Progressive profiling reduces form friction while building richer CRM records over time:
- 1.First visit: capture email (and consent if required).
- 2.Return visit: prompt for company size, role, or intent signal.
- 3.Later touchpoints: collect phone or booking preference as needed.
- 4.Review enriched profiles in your CRM or LinkInBioPremium lead list.
15. Publish and share
- Copy your public bio URL from the dashboard.
- Add UTM parameters per channel before distributing.
- Place the link in social bios, YouTube descriptions, email footers, and ads.
- Share /book/{username} when appointments are your primary conversion.
- Use one canonical bio URL so attribution consolidates in reporting.
16. Monitor pipeline attribution
Review leads in your CRM filtered by UTM properties or LinkInBioPremium source tags. Compare campaigns by lead volume and downstream pipeline stages—not raw click counts alone. Review recent Selling orders under Dashboard → Selling and booking volume under Dashboard → Booking → Analytics.
17. Account, billing, and privacy
Manage your Premium membership subscription and invoices under Dashboard → Billing. Your monthly fee covers the platform (including Selling and Booking); LinkInBioPremium does not add an extra 12% take-rate on your creator sales on top of that subscription. Platform membership refunds are covered in the Refund Policy—refunds for products, tips, quick-pay, or paid appointments you sell are between you and your buyer. To export or delete data, see Account Deletion and the Privacy Policy.
18. Troubleshooting
- Lead not in CRM: confirm integration is connected, field mapping is valid, and required CRM properties exist.
- Missing UTMs: verify the shared URL includes parameters and you are not stripping them with a redirect.
- Shoppable grid missing: confirm the Shoppable Action Videos section is enabled under Page layout, items have media + HTTPS CTAs, then save and hard-refresh. On a locked child page, unlock (entry / password / code) first—gated media is not in the public snapshot.
- CTA clicks stay at zero: tap the CTA on the public page (not only open the player), wait a few seconds, then refresh Link Builder; confirm you are editing the same page slug visitors opened.
- Donation / product not showing: confirm you are on Premium, the Selling block is enabled and saved, then hard-refresh the public page.
- Booking slots empty: confirm weekly hours, service duration, timezone, and that blocks or Look Busy are not covering the day.
- Zoom clients missing a link: create the Zoom meeting yourself, open Appointments → Meeting link, paste the URL, and choose Save & email client.
- Add to Calendar does nothing on iPhone: open the manage link and use Add to calendar (hosted .ics) or the Google Calendar fallback—not a downloaded blob preview.
- Short link 404 / disabled: confirm the alias is enabled, not blacklisted, and that Free-tier retention has not purged inactive links.
- Custom domain Verify Domain fails: wait for DNS (often minutes, up to 24–48 hours), confirm the TXT and A records match the dashboard exactly, and that no conflicting CNAME remains on that hostname.
- Checkout errors: confirm Stripe Connect and/or PayPal onboarding is complete for card rails, or that your crypto wallet is saved and Crypto is enabled; confirm the product is published.
- Crypto payment stuck: buyer needs a browser wallet on the correct network (Ethereum or Polygon), enough ETH/POL for the quoted amount plus gas, and should wait for at least one confirmation before retrying verify.
- Buyers cannot reach you: set Customer Support Contact under Dashboard → Account (email and optional messaging URL).
- Duplicate contacts: enable deduplication rules in HubSpot or ActiveCampaign.
- Form errors: check required fields and email format validation.
- Still stuck? Submit a request through our Contact page with your account email and a screenshot.
19. Affiliate referrals
Share your personal referral link from Dashboard → Referrals. Track link clicks, signups, and free vs premium conversions in the Link Performance tile. Full program terms, payout rates, and attribution windows are documented on the Affiliate Program page.
20. Frequently asked questions
Is Selling available on the free plan?
No. Digital downloads, tips, quick-pay, and payment onboarding (Stripe, PayPal, crypto wallet) are Premium features. Upgrade under Dashboard → Billing.
Are Shoppable Action Videos available on the free plan?
Yes. Free and Premium can publish the shoppable portrait grid, CTA click tracking, and Themes → Shoppable videos packs. Free also includes up to 5 pages for gated libraries. See /shoppable-videos.
Can I password- or paywall-protect a page?
Yes on child pages only (not Home). In Link Builder → Page access, choose Entry, Password, or Paywall. Paywall creates a hidden Selling product and emails an entry code after checkout; you can also mint codes manually.
Is appointment booking available on the free plan?
No. Booking (services, staff, availability, payments, reminders, and client manage links) requires Premium. Open Dashboard → Booking after upgrading.
Are short links available on the free plan?
Yes. Free accounts can create up to 20 short links at p1.do/s/…. Premium raises the cap to 200 and unlocks custom domains, tracking pixels, and the developer API. Inactive free links may be removed after 90 days (with email warnings).
How do I attach a custom domain to short links?
Premium only. Open Dashboard → Short Links → Domains, add your hostname, publish the shown TXT and A records at your registrar, then tap Verify Domain. Successful verification registers the domain with Firebase Hosting for HTTPS automatically.
Do I need to connect Zoom?
No. Choose Zoom as the service location, create the meeting in Zoom yourself, then paste the join URL on the appointment and email it to the client. Google Calendar is optional and separate.
Can I accept crypto or e-currency?
Yes. Under Dashboard → Selling, paste your EVM wallet address (Ethereum or Polygon), save it, and enable Crypto. Buyers connect a browser wallet and send ETH or POL directly to you. The flow is non-custodial—LinkInBioPremium never holds your crypto and does not need seller API keys.
Does LinkInBioPremium take 12% of creator sales?
No. Your Premium subscription covers Selling and Booking. We do not take an extra platform percentage of your creator profit. Stripe/PayPal processor fees still apply on those rails; crypto has network gas fees only.
How do I add a donation button?
Open Dashboard → Selling, add a Support / tip block, set suggested amounts, save, and open your public page. Buyers can pay with whatever checkout methods you enabled.
What appears in the public page footer?
Every public creator page shows a small legal footer with Privacy Policy, Terms of Service, and Disclaimer (linking to https://p1.do/privacy-policy, https://p1.do/terms-of-service, and https://p1.do/disclaimer by default), plus the copyright line. It is not a Contact Us footer. Free plans always use the P1.do links; Premium can customize copyright and the three URLs under Link Builder → Page footer.
Can I create more than one bio page?
Yes. Free accounts get up to 5 pages. Premium accounts get unlimited pages. Child pages have their own slugs, themes, section visibility, and optional Page access gates. See Dashboard → Pages and /pages.
9. Social accounts